HOME WEB WTB CULTURE WTB TECH REGISTRY GALLERY
WASHTUB BASS CONSTRUCTION
Unique Models       Plans/Instructions       Commercial Models       Building Tips


NOT YER GRAMPA'S WASHTUB BASS

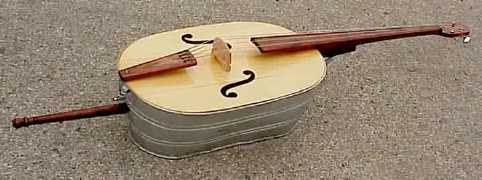
The GREAT SEXTOGUIDRUM                    Dave Thompson
BassDrum
I used a six-string bass guitar neck and a 21-inch bass drum, a No. 3 washtub, four feet of red oak and assorted hardware all in stock at Home Depot, and six genuine bass guitar strings. At $200, it still cost much less than a bass viol and isn't made of varnished wood needing careful handling while being much too large to handle carefully. And, with the end pin (made of two feet of scrap 1/2 inch electrical conduit with a cane tip on the end) retracted, it fits in the back seat of my Chevy Cavalier!

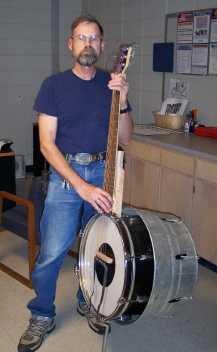
FRAME BUCKET                   Michael Bishop
FrameWTB
I used a plastic bucket because I couldn't find a real washtub, so the sound is a bit soft and quiet. The unique thing about the design is that I suspended the bucket between two legs so you can tilt it back and forth while you are playing, like a real standup bass. Also, since there are two legs (instead of a single peg in the middle on the bottom crosspiece), you can lean it against a wall or a chair without it falling over.

DOBRO BASS                   Ozarkana Jon
Dobro Bass
The neck of my Dobro-style resonator bass is formed of two pieces of baseboard molding glued together. There is a natural "pocket" formed in the middle. I chiselled out some more wood so it would slide on to a steel "L" bracket fastened to the end of the tub, making it easy to disassemble for transport.

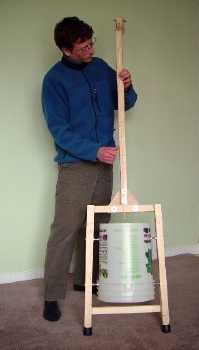
"ERNESTINE"                   Cap'n James Cook
Capn2Tub
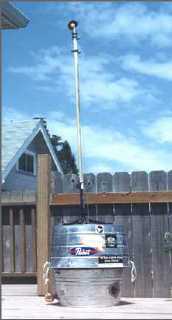
To make the neck, I removed the top half off a $10 guitar stand, leaving an extremely sturdy tripod with a 7/8" opening. I took a 4' X 1" birch dowel and filed the bottom 4" or so, and pounded it into this socket with a mallet. (A small extension on the lower part of the stand is only tack welded on and can be knocked off with the same mallet.) Put 1" rubber furniture feet over the existing rubber feet, and shorten the two longer legs of the stand so the neck stands behind the tub center.

Between the tubs is a circle of 1/2" plywood, flush with the bottom of the top tub, with about a 1" space all around to port to the outside air. It's held in place by 2x2 spokes at 12, 3, 6, and 9 o'clock, attached to the tub with sheetrock screws.

Then I took a #1 tub and attached it (open end up) to the bottom of the wood disk. I used 1 1/4" deadbolt drill bit to put about eight holes in the plywood so some sound would pass through, and I'm still experimenting with that.

The G-TWANG                   Stephanie Hansen
GTwang
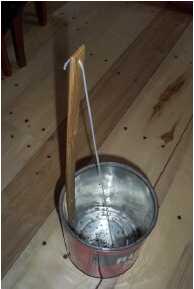
The g-twang is like a miniature washtub bass, made from a one-gallon paint can with a doubled yardsticks bolted to the side and a weedcutter string attached to the end of the yardsticks and bottom of the can. It is played bottle-neck style.

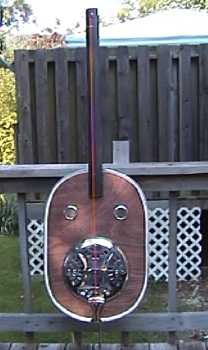
THE STUDIVARIOUS                   Studio Stu
Studivarious
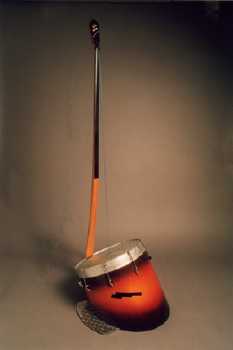
The body of my "Studivarious" is an 18" maple bass drum shell, cut obliquely to give it a 'leanback', with two f holes (and a vintage sunburst finish.) The bottom few inches of a tub are cut off and attached as the head. The neck is curly maple, with an ebony fingerboard and a curved flat bottom that fits into the rim of the tub to hinge without twisting. You stabilize the bass by standing on a retractable plate at the bottom.

BUNGEE BASS                    Chris Dennstaedt
Bungee Bass
The neck of the Bungee Bass, which runs the length of the sculpture, is a cardboard tube used to roll up carpet. The two boxes that make up the body of the bass are offset so as to act as a cutaway to allow the fretting hand greater access to the bridge-most end of the bungee cord. The bungee cord stretches from the top end of the tube, across a cardboard bridge and then into the bottom end of the tube. Like the Mailing Tube Marimba, the bass is modular; the boxes unbolt from the neck and the plunger fiddle spike/stand unscrews from the bottom of the neck.

BARROW BASS                    Rick
Barrow Bass
The wheelbarrow is a TrueTemper 6 cubic ft. contractor model. I use DiAdarrio mandobass strings. The top is 1/4" oak ply. The neck is maple, the fingerboard and tailpiece are bloodwood, and the bridge is cocobolo. It actually has very nice tone and fairly good volume. The tub easily detaches from the handle and wheel assembly and I have a variety of posts for different size players.

ROCK 'N FINGER TOO                   Jim Bunch
Gutbucketeer
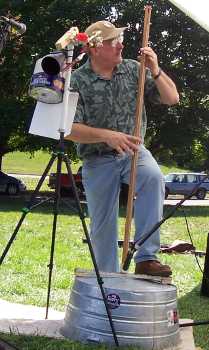
I have built a cross brace for the pole using a board the width of the tub supported by two small blocks that fit on the rim. This allows you to support the pole closer to the center of the tub and get good notes without putting as much tension on the string and your fingers. [Moving the pole changes the string tension and the pitch, but] you can also move up and down the pole to change notes. I tend to both adjust the tension and finger 5ths when I play. I screwed a rubber table leg cover to the middle of the cross brace that the pole fits in. This allows the pole and brace to be disassembled for the trunk of the car.

A TRULY UPRIGHT BASS                    Ol' Dan
Truly Upright
The upright [neck] is a wheelbarrow handle with an oak fingerboard, rounded at the edges. String is upright bass G-string. A long lag bolt, lot of glue and an L-brace attach the upright to the board spanning the tub's bottom. The board is hooked to the tub's handles with turnbuckles. Tunable, and immensely playable, the thing sounded best, and was easier to play, when resting on top of a 5-gallon bucket with notches cut in its rim in which the rim of the tub sat for stability. I got about an octave and a half out of it. Tuned it mostly to D.


Back To Top

PLANS & INSTRUCTIONS
(Click left column for details, thumbnail for larger pic.)
The Classic Modelby "Barefoot Larry" Collins
Oval-Tub Upright 4-Stringer by Bill Koch
Panel Bass Panel Bass Slimline Design
by Norman Desrosiers
Stretch and Fret Both Slappable WTB by Warren Yates
The Doodle Bass The latest from d-i-y guru Dennis Havlena
Kevin Potter's Upright Concept from Mother Earth News (Sept. 1980)
Pump Action Garbage Cangarbage thumbby Dennis Havlena
The Birdsley Bucket bbuck thumbUpgrading the Lowly 5-Gallon Paint Can
The Tub-O-Tone "The WTB Taken to a Higher Plane"
The (Dung) Beatle 2-String BassTim McClure's Parallel-Neck Design
Tin-Top 4-Stringer Oak'n Steel Upright by Pat Lane
Tubless Electronic Modelby Norman Desrosiers
Tubotonia's Barre-L-TonePickle Drum Bass
Ply-top 4-Stringer Another from the hand of Havlena


An Early Tub-O-Tone
Tub-O-Tone Experimental Model (1997)
Note the Pedal-Operated Counter-String


Back to Top
Next Pic


SOME COMMERCIAL MODELS
(Click heading in left column for details.)
Bogdon Box Bass Corrugated Cardboard Creativity
Boland Custom Bass Plytop 4-Stringer
Cable Tub Bass Nautical Craftsmanship
by Kenton Owsley
The Galvatone Havlena-Style Four-Stringer
by Bob Flesher
Whale Bone Bass Really Deep Sound
(No Bones About It)


WTB BUILDING TIPS
Concepts      Resonators       Necks      Feet      Connections      Misc Tips


WTB CONCEPTS
  • Catbox bass: a 16" piece of 3/4" shelf stock, with a screw eye on center about 4" from one end and a shallow hole for a stick socket about 2" from the other end. Feet on each corner of the board to hold it off the floor, and a 54" macrame cord string running from the screw eye to the upper end of a mop handle stuck in the socket. Finally cat litter box set bottom-side up across the board inside this triangle and screwed down to the board. No contact between string and box, but it sure does work. (Norman Desrosiers)

  • The Wongawilli Colonial Dance Club offers this info on the bush bass-- as the tea chest bass is known in Australia: The thin ply box of about 70cm cube is generally placed on the ground with the open top, face down, or sometimes side out and partly reinforced with a board...Usually the tea chest is cut down to about 50-cm height to suit the average person and the open end braced. Legs 2.5 cm x 2.5 cm can be fixed inside the corners and protruding about 5 cm at the front and 2.5 cm at the rear to raise the box off the floor and let the sound out. The pole is about 82 cm long with a nail at the bottom end to anchor it through a hole into the corner of the tea chest.

  • [In a Mudcat Cafe post, JohninKansas gave this description of his double-decker tub bass: #1 tub, 12 gal, "rightside up" on the bottom. 3/4" thick plywood ring, tapered to fit the slope of the bottom tub - about 2" wide. On top of the support ring, a piece of 1/4" thick masonite, with about a 1.5" hole in the center. #0 tub, 9 gal, upside down on top of the lower tub. A "T" shaped wooden assembly lays over the upside down top tub, and 3 turnbuckles hold it down to the base. The "T" also anchors the "fingerboard," made of a split and shaped 2x4 -- finished dimensions about 1.5x3 at bottom, 1.5x1.8 at top, crowned for easy fingering and about 4.5 ft long. (JohnInKansas)
Back to Tips Header

RESONATORS
  • One of the better tubs I've made was out of a 55 gallon drum, cut off at the 1st ring. The drum has a fully removable top, so I take a piece of 1/4 inch luan plywood and cut it 1/2 inch larger than the barrel top. Using the ring that held on the metal drum top I compress the luan onto the barrel. The ring acts as a tension ring very similar to the tone ring on a banjo or drum top. I make holes in the barrel side to let out the sound with a large hole punch. (John Smith)

  • In Vietnam in 1966-67 I made one using materials at hand and performed as a member of the 48th Assault Helicopter Company "Blue Stars". I used half of an oil drum (we cut them in half for use under the latrines), a mop handle from an Army issue mop, and a length of commo (communications) wire. The wire was a bit hard on the fingers, but it was strong enough to pull a tone from the bottom of the drum. (Ed Jenkins)

  • I have been using a plastic plant container. (Click for pic.) It has a much deeper and warmer tone than a metal tub. The string I use is a "D" gut string for a standup bass...I love it!! (Jimers)

  • [I've never known a square tub to sound as good as a round one can. Besides, square tubs in my neck of the woods tend to have a starburst reinforcement pattern in the bottom, and I always figured concentric corrugations made better acoustic sense anyway. So I asked Roy Carver about his Stradibucket's (Click for pic.) square tub. He replied:] Truth be known, I had trouble getting a good sound out of this tub. I think the reason has to do with the weight of the metal- it was a very thin tub. I ended up welding in a piece cut from the hood of a car! I have a friend who made a couple with heavier tubs and they have a great sound with lots of volume.
Back to Tips Header
NECKS, STICKS & POLES
  • For the neck, I used a guitar stand tripod with a mop handle pushed into it, and for the fingerboard a section of 3Ăš4 oak flooring about 4 1Ăš2 feet long. (Kevin Grove)

  • I use a pool cue for the stick. The tone from the maple hardwood is better than a pine broomstick, plus it has a replaceable leather tip. As a bonus the pool cue has a checkered grip area for a better hold than a smooth handle. The novelty of it attracts attention and I have my own cue if I want to shoot some pool! I tie the line to the rubber bumper screw on the butt end of the stick. (Ozarkana Jon)

  • I used an aluminium pipe for the stick with a guitar tuning peg on the headstock. My tub is a classic washing bucket, also made of aluminium. Though the pipe is well fixed to the tub, I can still flex it so that I can enjoy a wide range of a vibrato, and can fly through three octaves. Sometimes I use a bow to get a sound which is very near to viola or a morinhoor. (Sarp Keskiner)

  • The stick is a cut down shovel handle - the best I have found. I have used the same stick for over 30 years now. I have tried others, but I didn't like them and went back to the old one. The stick just floats around on the top side of the WTB. [Click for Pic] (Chuck Porter)

  • Pour a layer of epoxy on the rim end of your stick, then file a notch to fit over the rim. This not only prevents wear and splitting, but seems to intensify the sound. (Duane Ratliff)

  • I have a one string washtub with a mop handle. I used to use a broom handle but found greater pitch variation with the slightly thinner /longer mop. (Xopher Thurston)

  • ... I think one very important thing is to have a metal cap on the [tub] end of the stick. The one I played with the cap was much louder and much, much clearer than one without. (Kip Dale)

  • My stick is a hoe handle which I notch out the end to fit in the lip of the bucket. I fill the end of it with high density foam to prevent metallic sounds. (Dave Lerner)

  • I also carved and inserted a nut out of ebony that, of course, is placed near where the string emerges from the hole at the top of the broomstick. This stops the string from wearing out at this critical angle and also produces, I believe, clearer tone. (Den Poitras)
Back to Tips Header
FEET & FOUNDATIONS
  • I do not put my foot on top of the Bass. I do not put a block under it either. I use an old buggy step on the right side near the bottom for my right foot. I then set the bass flat on the floor and use the handle of the tub as a pivot point on the left side. (Chuck Porter)

  • The best way to elevate the rim of a conventional tub bass is to use the rubber head of a toilet plunger. Cut a slot [in the shank] where the handle screws in, to snap tightly over the rim of the tub. I place one in front and one on the side under my foot position. They flex under pressure and prevent the tub from moving while it is being played. (Duane Ratliff)

  • Legs just high enough that baby chicks could run underneath ...give the best combination of the bottom sound wave with the top wave making the sound louder. (Cleve)

  • This was more important when I used it acoustically. I have also mounted my bucket on a 2.5' x 4' piece of plywood covered with carpet. The reason I mounted it is I'm sure you know what its like to stand on one foot for 5 hours during a gig. This setup works great. (Dave Lerner)

  • I use old sawed-off crutches with rubber tips, [attached to my kick-drum Street Bass] which enables the sound to come out and prevents it from slipping around on the floor while performing. (Den Poitras)
Back to Tips Header
STRING CONNECTIONS
  • Instead of a tub he used a bass drum. His was a fairly small diameter rock & roll bass drum. It only needed one head-- the other side was face down. Reinforcing the head around the hole through which the eyebolt passes is necessary though. Dr. James used leather washers which he glued into place on both the top and bottom of the head. They were rather thick, like belt thick but not as stiff, as I recall and about two and a half inches in diameter. Other than that his design was fairly standard tub type. (Reggie Miles, in a post to Mud Cat Cafe, describing the drum-bass created by Dr. James Rhythm; edited by lfm)

  • I simply saw a slot in the top of the pole which the string fits into and then drill a hole perpendicular to the slot for a bolt which when tightened pinches the two sides of the pole together and holds the string. (Jim Bunch)

  • [In converting a drum into a bass] I used thick felt washers on the drum head, with an old cymbal underneath, to prevent tearing the head. It's very deep and loud-- a beautiful true bass sound. (Gary Forney)

  • I used a "U" shaped bolt that is used to connect lets say like you would connect a dog run cable to the eye bolt on your house. You put a small eye bolt in the tub. Then the cable goes through and doubles back. The "U" bolt tightens around the folded over cable and the two nuts on the end of the "U" along with the bridge piece hold the cable. Then I taped it with grey electrician's tape to eliminate vibration. (Nick LaVigne)

  • To increase the life of the tub, I don't use an eye bolt to attach the string. Tie a knot in the end of the rope then put on a steel washer with a hole smaller than the knot, then an old wooden thread spool, then a piece of drum felt. Make a 1/4 inch hole in the tub, with a rubber grommet, and thread the rope up through the bottom. Attach the rope to your stick and you're ready to play. (Curtis Chamberlain)

  • I soldered a bent eye-bolt to the center of my washtub using plumber's solder. This, in my opinion, gives a much better transmission of sound than bolting or running the string through a hole. (Thor Bahrman)
Back to Tips Header
MISCELLANEOUS TIPS
  • Between the sides of the box of my tea-chest bass I have tied a criss-cross of adjustable "tensioning strings". Another string is then wound in and around the point where all these strings meet and is then pulled tight, knotted and tied into a small loop to which the "playing string" can then be easily tied. Another string is tied to one of the two tambourines I keep inside the box, which then crash on each plunk. ("Nervous Paulvis" Eggsley)

  • By attaching a good strong spring between the bottom of the eye bolt and a wooden cross frame about an inch from the bottom edge of the tub, you can get more sustain. Another benefit is, when used on a plastic tub, the tub head will not mound up and make it go flat! (Jim Uticone)

  • We taped the handles, used an old hockey stick with nylon cord fastened to an eyebolt which goes thru a round piece of wood with a leather washer between the metal (inside of tub) and the wooden spacer. (Alan C Hixson)


Free Website hosting has been generously provided by
Free Homepage.com