Several posts to bass discussion groups, over the years, mentioned an upright wtb supposedly described in the pages of The Mother Earth News. Despite careful thumbing, I was unable to locate such an article, although there was one describing an ordinary wtb. Finally it has turned up-- a diagram for a (potentially multi-stringed) upright bass designed by Kevin Potter, in Marc Bristol's column on homemade instruments in the September/October 1980 issue (#65).
Here's what Marc has to say about the design:
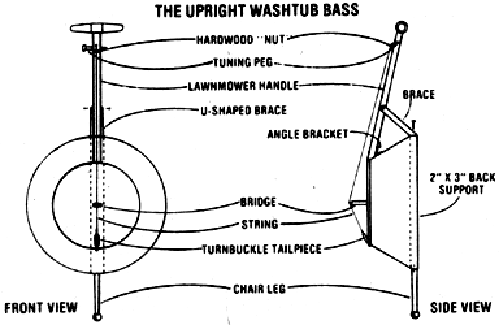
Kevin Potter...calls the invention an upright washtub bass . . . and it's essentially a banjo-style version of the bull fiddle, which uses the tub for a "pot". Kevin's creation is a hybrid instrument . . . made partly from scrounged pieces and partly from elements of a conventional bass fiddle. The neck of the musicmaker is a hardwood push-mower handle, and the stand is actually a chair or table leg. The fiddle's tuning peg, bridge, and string are the same as those used on a "real" instrument. (Kevin and I agree that it is possible to make the same pieces out of any good hardwood scraps ... and that you could use nylon filament, or even clothesline, for the string.)
In addition, you'll have to find a length of 2" X 3" wood for a back support (actually, any board that's close to those dimensions will work, as long as it comfortably spans the diameter of the tub at the container's open end). You'll also need a U-shaped brace . . . which can be welded together out of scraps of steel or iron. At its open end, this brace straddles the neck of the instrument and is bolted to it . . . while its closed end is lag bolted-- through the tub-- into one end of the back support (see the accompanying illustration.)
The mower-handle neck is attached to the tub with wood screws and a small angle bracket. You'll also need one turn-buckle per string, a double-ended screw to secure the chair leg in place (if it didn't come with one of its own), and a small piece of hardwood to use as a "nut" (where the strings rest at the top of the neck.)
You can form the holes to hold your tuning pegs by one of two methods. On his project, Kevin employed a series of six different drill bits . . . boring about 1/4" deeper with each successively smaller bit. Another-- and equally effective-- way to form the conical hole is to make the initial bore with the smallest size bit you have, and then enlarge the opening with a repairman's tapered hand reamer . . . a tool which is available at most hardware stores. (The turnbuckle tailpiece is simply bolted in place through a hole drilled in the tub's bottom rim.)
As you can see from the diagram, the neck tilts slightly backward from the edge of the "drum". That's to allow for a taller bridge (which must be set at a height that will keep the string almost parallel to the neck) . . . because --as a general rule-- the higher the bridge, the more resonance and volume your instrument will produce. (If you buy a standard bridge, of course, the dimensions of that store-bought part will determine the neck angle on your washtub bass.)
The great advantage of Kevin's innovative design is that it gives you the option of adding extra strings to the instrument to extend its tonal range. (It's even possible to make a four-string upright tub bass . . . but if you do so, you'll need to use a wider piece of wood for the neck.) The instrument is played like a "real" bull fiddle (not like the regular gutbucket I described in my original column) . . . and can also be bowed --if it's fitted with more than two strings-- after you've reshaped the neck to match a commercially manufactured bridge.